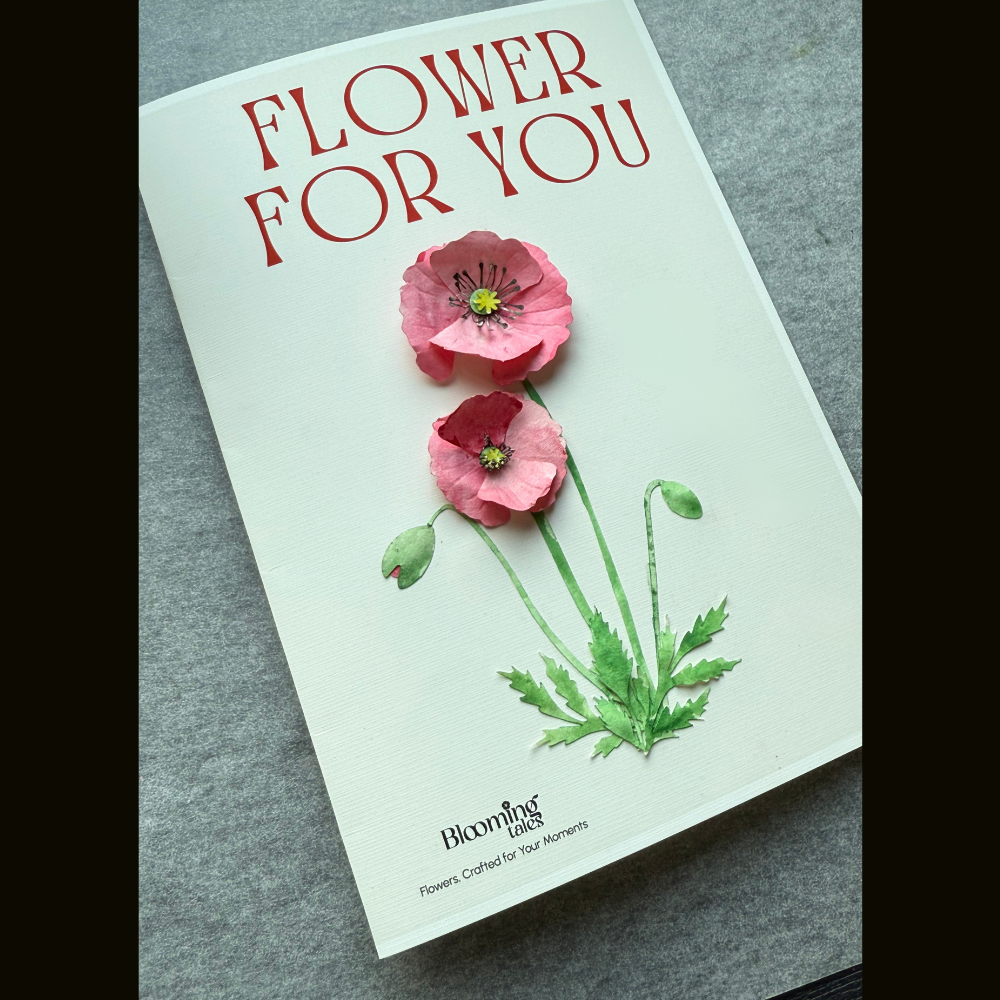
Handmade paper flowers can make any project extra special. In this tutorial, you’ll learn how to create a 3D poppy that can be placed on a greeting card or arranged in a frame—perfect for birthdays, graduations, thank-you notes, or lasting home décor.
Whether you’re new to paper flower making or an experienced crafter, this project is easy, fun, and requires only a few tools.
What You’ll Need
-
Card base (A4 or A5 folded) or plain cardstock if framing later
-
Plain paper (I used 120 gsm and added color, but you can also start with colored paper)
-
Free poppy template – download at: bloomingtales.art/collections/diy-templates
-
SVG file only – use with a cutting machine (Cricut, Silhouette, etc.) or print and cut by hand with a craft knife
-
Craft glue
-
Optional: ball tool for shaping (or an empty pen without ink)
Skill Level: Beginner-friendly
Project Time: ~30–45 minutes
Step 1 — Cut the Pieces
Use the free template to cut:
-
2 flowers (1 large + 1 smaller) – each flower has 2 big petals + 2 small petals
-
Leaves: 3 pieces
-
Center: pieces labeled +1, +2, +3
-
Stems: 4 pieces
-
Buds: 1 plain green bud, 1 “blooming soon” bud (small petal + green bud)
Tip: Lightly curl the petal edges with a pencil for a softer, more realistic look.

Step 2 — Add Color
Paint or color your pieces before assembly:
-
Petals: Red (2 big + 2 small for each flower)
-
Centers: +1 Black, +2 Green, +3 Light Yellow
-
Buds & Leaves: Green
Let everything dry completely.

Step 3 — Shape the Pieces
Use a ball tool to press and curve the petals, centers, and leaves to give them a natural 3D effect.
No shaping tool? Use an empty pen tip and make gentle circular motions on a soft surface (like foam or a mouse pad).

Step 4 — Assemble the Flowers
If using for a card, glue onto the card base. If you plan to frame it, glue onto plain cardstock.
-
Glue the stems first.
-
Add petals – place 2 big petals opposite each other, then 2 small petals opposite each other.
-
Build the center – glue piece 1, then 2, then 3.

Step 5 — Add the Buds
-
Plain bud: Glue the green bud directly to the stem.
-
“Blooming soon” bud: Glue the red small petal first, then place the green bud piece (with a V-shaped notch in front) on top so the petal peeks out slightly.
Position buds at different angles for a more natural look.

Step 6 — Add Leaves & Finish
-
Glue the leaves at the base of the stems to hide joints and complete the design.
-
Let everything dry completely.
-
Your 3D poppy is ready! Keep it as a greeting card or display it in a shadow box frame to protect its shape.

Display Ideas
-
Greeting Card: Send as a heartfelt, handmade gift.
-
Framed Décor: Create lasting wall or desk art.
-
Gift Topper: Attach to a wrapped present for an extra special touch.
Follow our video tutorial: https://www.youtube.com/turorial
Free Download
Get the free SVG template here: bloomingtales.art/collections/diy-templates
Share your creations on Instagram with #PaperPoppy #BloomingTalesDIY #PaperFlower #Cardmaking #Papercraft #HandmadeCard.


